Aaron and I watch HGTV a lot and so of course, I’ve become obsessed with white kitchens. I love how fresh and airy they look and how you can keep them neutral and chic or introduce little pops of color to keep it fresh. They’re dreamy and delightful and I’d decided a few years ago that I must have one someday.
When we built our home six years ago, neither of us really had any sense of style or how to even go about selecting color palettes. When the home isn’t built yet and you’re just looking at scads of carpet and laminate samples, it’s really tough to envision how it will all look together. We were young and naive and just did the best we could at the time with no advice from a professional. Thusly, we ended up with the world’s ugliest interior and our home felt dark and cave-like due to the dark trim and brown carpets (it was bad, y’all).
Over time, we replaced the carpet and vinyl on the main floor with wood laminate and had all the dingy dark brown carpets upstairs replaced with a high quality, plushy white that really complements the dark color on the baseboards. Replacing all the flooring was time consuming and expensive (we stretched it out over two years) but it was so worth it. The house looked and felt so much better. I no longer dreaded having first-timers over who wanted a tour of the place and the wood laminate actually helped with the dog fur situation because it was so much easier to sweep up. Occasionally, I’d still lament the dark cabinets in the kitchen, but all in all, we were pretty pleased with the house and had no plans to update anything else.
And just like that, disaster struck! We had a pipe burst in the wall of our living room which created a small flood that destroyed all the flooring (not to mention the wall, the baseboards, the bathroom floor, and my beloved wool rug). While it was quite a disruption in our lives, I know it could have been so much worse and I’m thankful Aaron was home and could turn off the water right away. That being said, it’s amazing how much damage that little pipe caused; we estimate that it ran for about 10-15 minutes and the entire floor had to be ripped out.

The water mitigation was the worst part, the crew that came to help was fantastic, but because the walls had gotten wet, they had to drill holes all along the living room at baseboard level and run tubes through to drain all the water. Then they set up several massive fans and a mega heater that all had to run 24/7 to dry everything out before mold could grow. The machines were so loud, it was like being on an airport tarmac. Rip and I stayed at my folks house the first night because we couldn’t take it. The second and third nights weren’t so bad, I think the noise had deafened us by then so we hardly noticed it. Though we still had to yell at each other to be heard:
“HEY HONEY, DO YOU WANT COFFEE?!”
“WHAT?!”
“I SAID DO YOU WANT COFFEE?!”
“NO, I ALREADY FED THE DOG!!”
In any case, the day the mitigation crew came out to remove the noise machines was a good day. And, we were delighted to learn that everything had dried out perfectly, mold crisis averted.

Then started a long slog that lasted about 2.5 months. First and foremost, let me tell you something about home insurance, you have to FIGHT for yourself. It took over seven days before a field adjuster came to our home. That was seven days of dodging nails that were poking up through the concrete and flooring remnants after the mitigation team ripped up the floorboards. It was pretty frustrating. Especially after hearing from friends with the same insurance and how they had immediate responses. I felt like we got a dud adjuster (we did for sure).
Anyway, I’m not going to get into the whole insurance bit, I know one bad apple doesn’t necessarily mean the whole company bites but I’m still a little bitter about our whole experience and we’re not here for that, we’re here for a budget renovation.
So, here goes, Aaron ended up installing our new floors himself, and this time, instead of picking a color that fit with the dark red-ish baseboards and cabinets, we decided to select a color that made us happy, baseboards be damned! Aaron did the actual picking because Lowe’s is his favorite store and we ended up with a toned down grey-ish hue that made my heart beat faster, THIS is exactly the color you might see on an HGTV home remodel and I was HERE FOR IT.

Of course, once we had the new flooring in, the remaining baseboards and matching kitchen cabinets clashed with it big time. It wasn’t a “maybe this can work” situation, it was an “OMG MY EYES, MY EYES” situation. So, since the house was still a hot mess with holes all over the walls and one wall still mostly missing, why not add on another project, there was no better time. We decided to be like the Property Brothers and paint the kitchen cabinets and new baseboards white. This meant we also needed to repaint all the door frames, window sills, and doors themselves.
To be honest, I didn’t think it was going to be as big a project as it ended up being. We were just painting, right? How long could that possibly take? Short answer-a long fucking time. you have no idea how many little bits and pieces go into a kitchen until you have to remove and paint it all. There were tiny strips of wood no longer than 3 inches all over; and keeping track of where everything went was a nightmare. And I need to give kudos to Aaron because he really did most of the work, I am endlessly grateful for him.
So, how did we do it?
First of all, we had to pick our white paint! Sounds fun and easy, yes? NO. It sucked. There’s too many white paints in the world and after days of holding swatches up to the walls and squinting I was starting to dream of dancing paint samples. We finally settled on a bright white (don’t ask me the name of the color, I have no damn idea) and asked for advice on how to tackle this project from a chatty Lowe’s employee.
Our first step was to acquire degreaser to wipe down EVERYTHING. This was super important according to said Lowe’s employee. She did us a solid though and recommended the stuff at the Dollar Tree rather than push Lowe’s more costly version (let’s call her Karen. Thanks, Karen).
Degreasing the kitchen took a couple of days, we wanted to be thorough so we took extra care on all the cabinet doors. The door frames and windowsill throughout the rest of the main floor just got a cursory wipe down and that seemed just fine. Then, it was time to prime. Karen, our friend from Lowe’s, recommended an all in one primer so that we didn’t also have to sand down everything. Aaron decided to try spraying on the primer with his paint sprayer and that turned out to be a disaster because it’s an oil-based product. Note to everyone, don’t use oil-based paints in your paint sprayer unless you can clean right away and have a shit ton of mineral spirits on hand.
Priming took about a week because the cabinets were so dark, we needed to do two coats on everything because we really wanted to make sure the paint would go on evenly with no dark areas. Even though all of this was pretty labor intensive, it was actually kind of fun, it was our first big house project together and we listed to the first season of the Serial podcast because Aaron apparently lives under a rock and had never heard of it before. So, we bonded over that miscarriage of justice (don’t @ me) and primed those bitch cabinets until they were good and coated.

Finally, it was time to paint. Luckily we’d selected a latex paint so Aaron was able to use the sprayer for everything that we could remove and take to the garage. All the cabinet doors, drawer faces, baseboards, door frames, and doors themselves got a good spray down. Everything else, the edging, windowsills, and cabinets themselves were my business with a mini paint roller and I did it real good.
All in all, painting took about three weeks total and we still haven’t put on a top coat. Since we went with latex paint, we needed to wait for it to harden and then we just kinda…didn’t do a top coat. Maybe this summer.
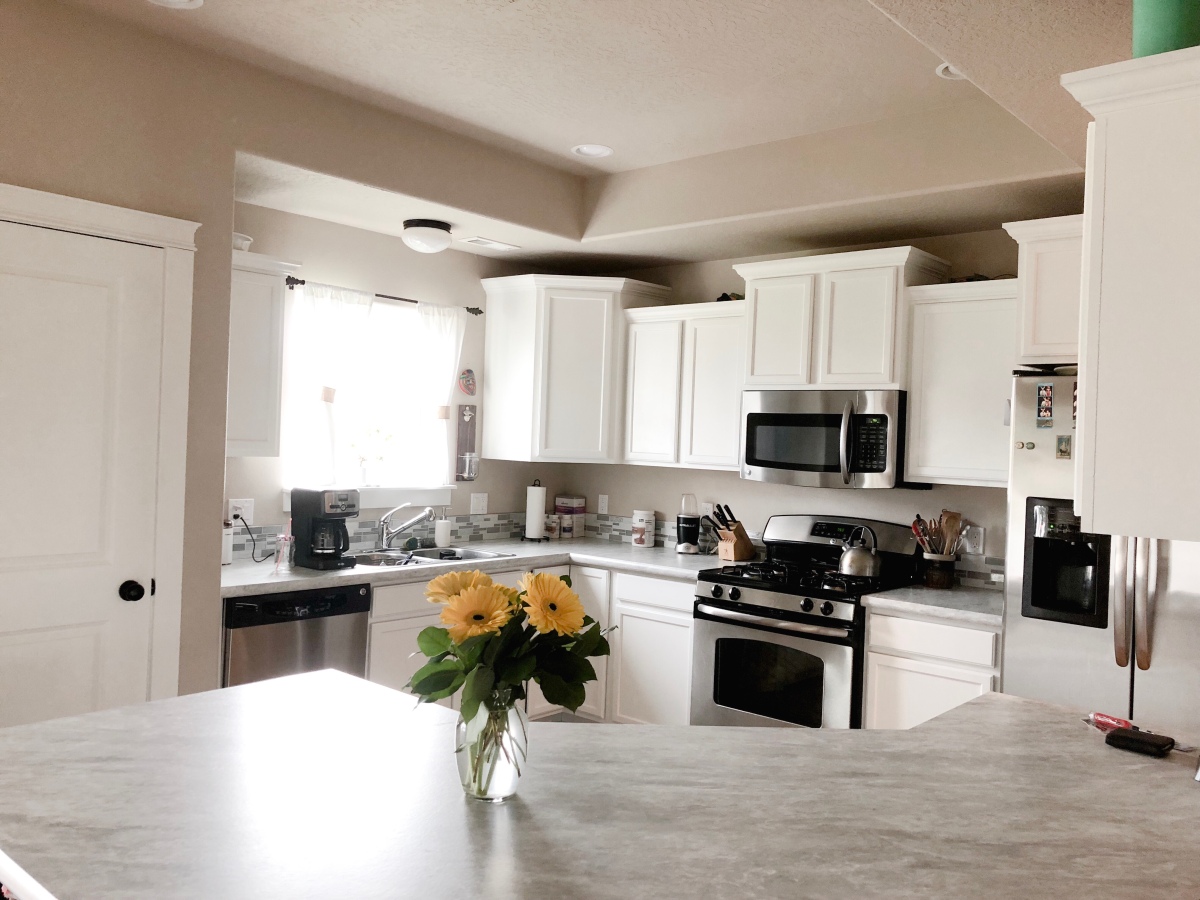
So, finally, we had a white kitchen, and it looked damn good if I do say so myself (I do). But we weren’t done, oh no, far from it. Now that we had these beautiful cabinets and our gorgeous new floor, we needed new counter tops because again, the ones we originally picked were ugly AF.
Back to Lowe’s we went to check out products and compare prices. I fell in love with this beautiful white and black swirled marble, but I’m a gal on a tight budget and that just would not fly. We looked at some of the manufactured hard surfaces and even those were out of our modest price range. So, we turned to the contracting company that had been hired to fix the holes in the walls from the flood. What did they suggest? Formica!
Yep, that’s right, good ol’ Formica. I wasn’t super sold on the idea until I found out you can order bull nose edging for your Formica counters. This gives the illusion of a hard surface at a glance, and I’m all about keeping up appearances. We decided on a cute gray quartz look and then settled in for a long wait before the contractor could order it in.
It was the longest three weeks ever because Aaron wouldn’t let us put anything back in the cabinets because, “we’ll just have to take it all out again”. I suppose he was right, but it sure made cooking difficult. I had to sift through stacks of drawers to find forks and dodge around kitchen appliances to get to the dog’s food bowls in the mornings. We ended up living off of Uber Eats and whatever my mom brought over when she had time to cook extra meals for us (thanks mom).
In the meantime, the contractors fixed the hol(e)y walls and installed the new baseboards and we slowly moved our living room furniture back in from the garage.
When counter-installation day finally came, I was so excited I nearly called in to work to stay home and watch the kitchen take shape. As it turns out, I should have done that because our neighbors called the cops on the contractors. The same contractors who’d been in and out of the house for days repairing the walls and installing the baseboards. The same contractors who had a key and who had spent hours upon hours in our home.
I was MORTIFIED. Not only did the neighbors call the cops, the cops SHOWED UP. No less than three police vehicles came screeching to a halt to surround the contractor’s truck, and five officers patted him down, interrogated him, and just basically scared the fuck out of the poor man. Luckily, Aaron was able to answer his phone after the contractor convinced the cops to call him, or he probably would have been arrested.
We were so horrified that this happened, especially after all the work they’d already done for us. I bought wine and pastries as an “I’m sorry please don’t fuck up our counters because our neighbors are morons” gift and hoped they would show up for day 2 of the counter install.
Luckily, these guys have balls of steel and didn’t let a little snafu with the police and our crazy neighbors* scare them away and four days later, the counters were done (YAS).
*side note, all jokes aside, I kinda appreciate that the neighbors were looking out but considering we’d had people in and out of the house for weeks, they don’t get much grace from me on this.
Finally, it was time for the finishing touch, the new back-splash. Before, it was just one 3-inch high row of bland tile and I never really thought anything of it. Initially, I really pushed for white subway tile, but again, budget constraints; so we ended up with a glass mosaic that we found on Lowe’s for an amazing deal and instead of buying traditional mortar, Aaron worked with MusselBound for an easy-peasy install; Aaron estimated it took him only one hour to do the entire kitchen! We also opted for a 5-inch high back-splash instead of going all the way to the bottom of the cabinets for two reasons, 1) it was cheaper and 2) it was easier. By ending the tile below any obstacles, we didn’t need to cut around outlet and switch plates, which was a win in my book (but let’s be real, Aaron did all of the work). Because we’re fancy, Aaron added a Schluter trim around all of the edges to finish it off.
And finally, it was done. After almost three months the kitchen was useable and the living room was livable and we felt like we had a whole new house. And you know what a new house needs, right? New furniture! But that’s for another post.


So, lets break down the cost of the entire kitchen project; I’m not going to include the floors because insurance did end up paying for that but if you’re considering laminate flooring, I can’t recommend it enough. And if you’re handy, you can save a bucket of money if you install yourself. Aaron learned how to on Youtube and it looks amazing (it’s also the third time he’s done it so he’s basically a pro).
Degreaser: $2

We used this stuff from the dollar store and it worked great.
Primer: $18;we chose this brand that the friendly Lowe’s employee, Karen, suggested.
Paint: $30 (ish), we went with this brand in bright snowy cloud sunbeam white or whatever.
Counters: $1,300; this included installation, product, and hauling of the old counters.
Back-splash: $60 (ish); I can’t find the exact type we chose but it was on sale, like this brand is currently.
Schluter trim: $30
MusselBound: $26
Approximate cost: $1,466 (ish) and many hours of work. But it was well worth it and I am still pretty shocked at how budget friendly this renovation was! It took a little compromise and a lot of patience but we are thrilled with how everything turned out.
My main takeaway from this project is, have patience and just keep working. At times I would be so burnt out on painting that I’d get home from work and the last thing I wanted to do was grab a brush and do another coat, but I’d just put on a pot of coffee and suck it (literally and figuratively). It also helps to have a super handy husband who’s not afraid to learn how to do new things to keep costs low. But truly, you can learn how to do most anything these days with the magic of Youtube videos.